1. Introduction
The purpose of this portfolio is to record my contribution to my software engineering project.
1.1. About the team
This project was done in a group of five, consisting of Shawn, Dominique, Jeun Hoe, Jun Hup and me. We are second-year students in National University of Singapore (NUS), majoring in Computer Science.
1.2. About the project
This project is part of a software engineering module that I took during my second year. We were tasked to optimize or morph a basic command line interface (CLI) desktop addressbook application for this project. We decided to morph the application into a team management application called Athletick which caters to time-based sports.
This application enables coaches or captains to manage their team by recording attendance for training sessions as well as track the performances of their athletes. One of the constraints set for this project is that the primary input to the application has to be CLI as it is meant for users who can type fast and prefer typing over the use of mouse. The duration of this project spanned over a period of 6 weeks.
This is what Athletick looks like when coaches or captains first launch the application:
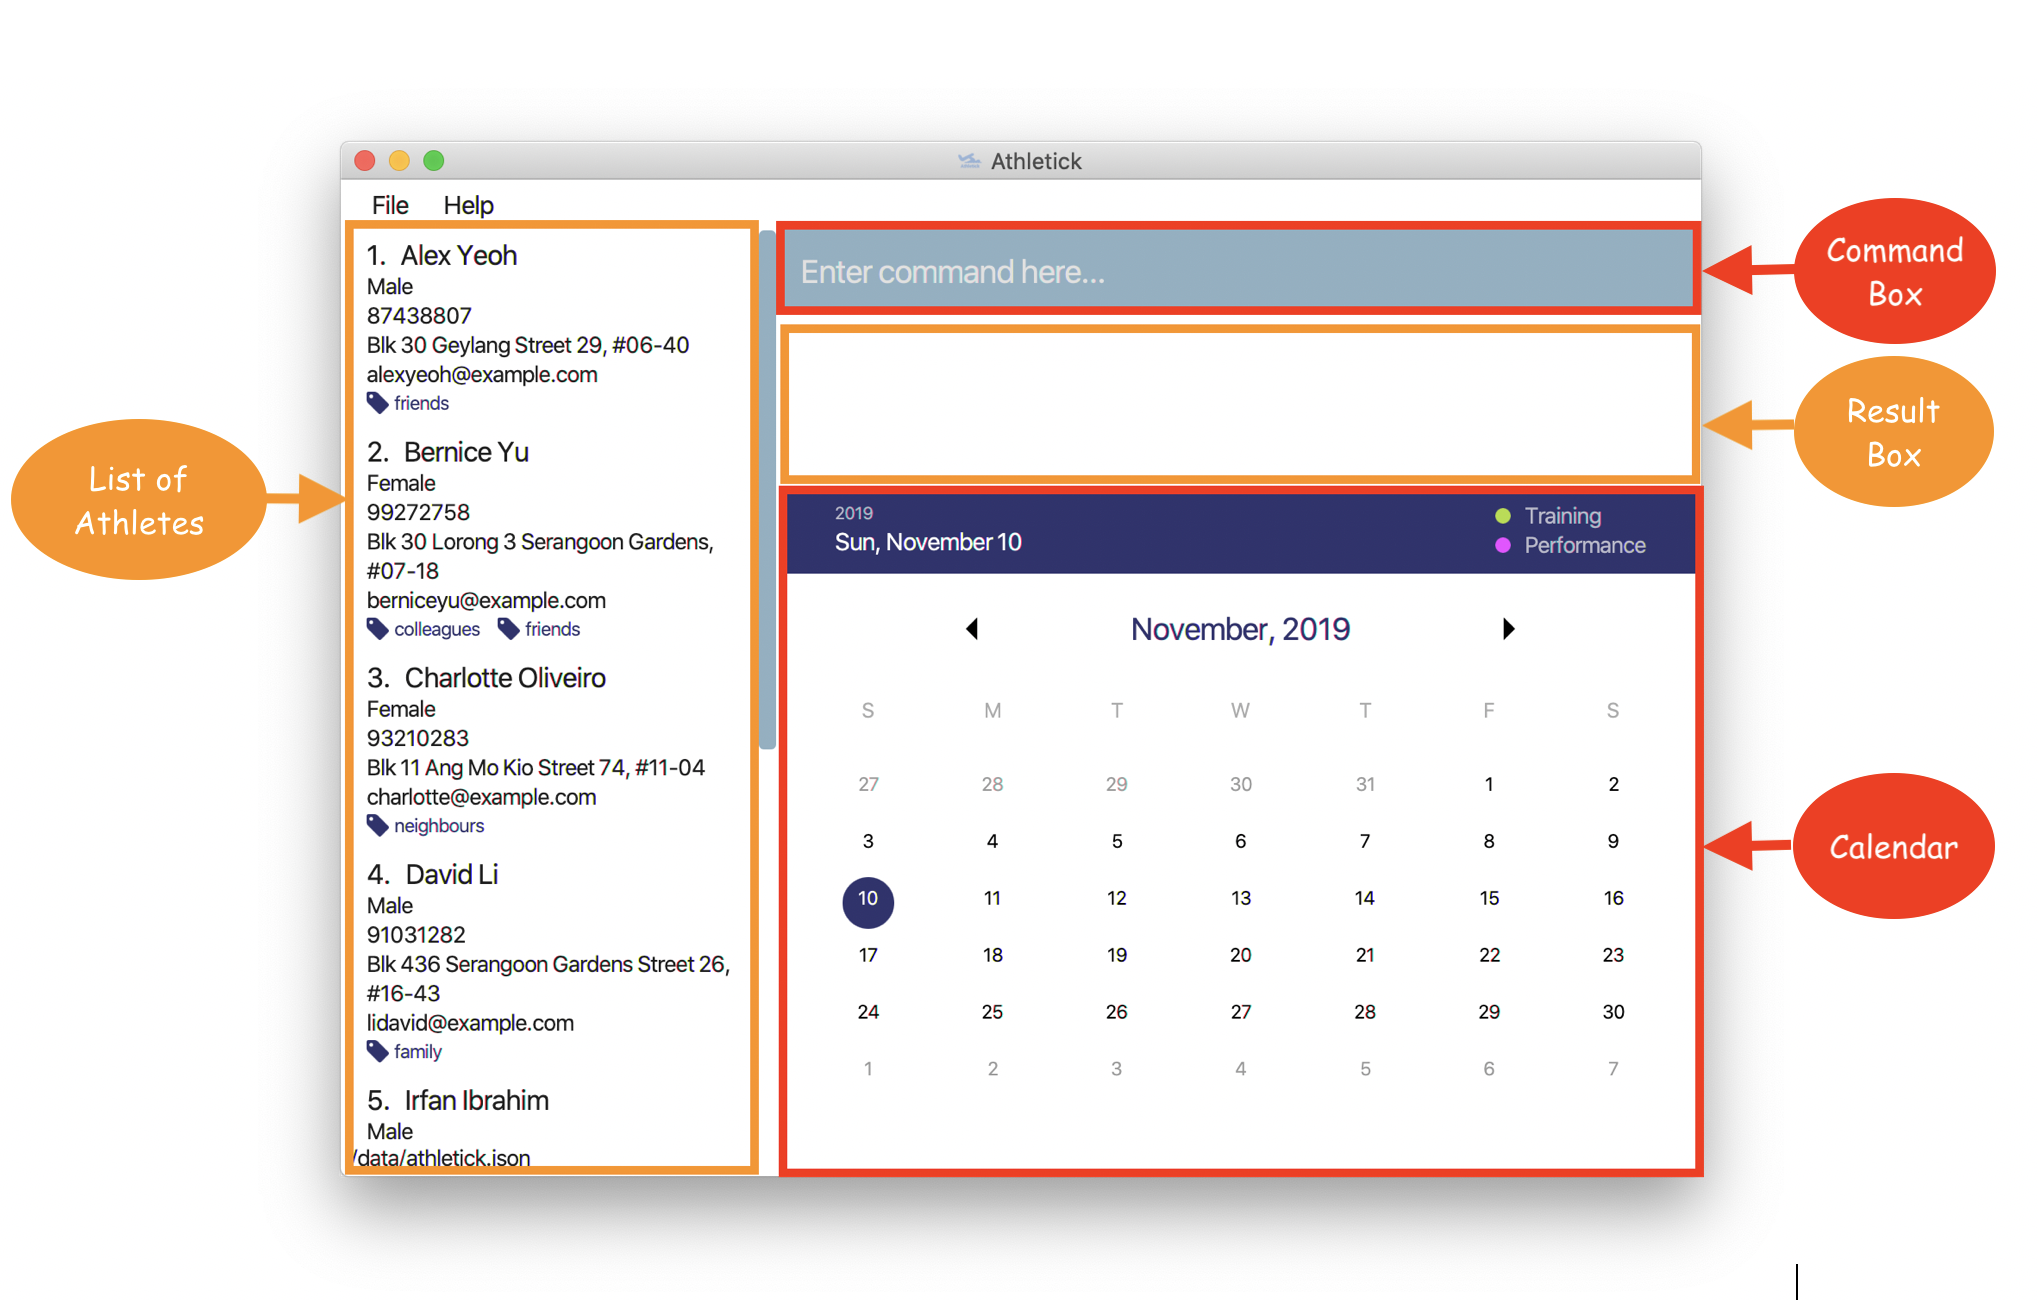
The following is a list of our main features:
-
Recording of attendance
-
Recording of performance
-
Viewing of attendance and performance on calendar
-
Viewing of athlete’s profile
-
Undoing and redoing of commands
My role was to design and implement the feature that allows users to view the profile of an athlete. The following sections will elaborate more on this feature which includes relevant documentation from the user and developer guides.
Note the following symbols and formatting used in this document:
Note the following symbols and formatting used in this document:
| This symbol indicates important information. |
command
|
A grey highlight (called a mark-up) indicates that this is a command that can be typed into the command line and executed by the application. |
component
|
Green text with grey highlight indicates a component, class, object or method in the architecture of the application. |
2. Summary of contributions
This section shows a summary of my contributions to the team project.
Enhancement added: I added the ability to view an athlete’s profile.
-
What it does: The
selectcommand allows users to view the profile of an individual athlete. -
Justification: There will be occasions when coaches or captains would like to track the progress of an athlete. The
selectcommand allows them to view the athlete’s personal information such as the name, phone number and email address. The attendance rate and performance of the athlete is also displayed so that it is easier to monitor instead of looking at the attendance and performance of all the athletes. -
Highlights:
-
This feature works with other features such as
findorfilterwhich reduces the need to go through the list when looking for a specific athlete. For this feature, there were many design alternatives to consider as there are many ways it could be implemented. The current choice of design was used because it was in line with the other features my group mates had implemented. -
I felt that the implementation was quite challenging because it requires a certain knowledge on how to use tools such as JavaFX and SceneBuilder which were used to design the graphical user interface (GUI). With no prior experience, the learning curve was steep which required more effort to learn about these tools.
-
Code contributed: Please click these links to see a sample of my code:[RepoSense Code Dashboard][GitHub Repository]
Other contributions
-
Project management
-
Managed release version 1.4 of Athletick on GitHub [v1.4]
-
Served as the team’s test engineer, ensuring that classes and methods generated by my team has been covered by test cases.
-
-
Enhancements to existing features
-
Updated
addandeditcommand to allow addition of images for an athlete’s profile by adding a prefixi/FILENAME.png. (Pull request: #75)
-
-
Documentation
-
Community
3. Contributions to the user guide
Given below are sections I contributed to the user guide. They showcase my ability to write documentation targeting end-users.
{Start of user guide extract}
3.1. Viewing more details of a team member : select
This command shows the profile of the athlete that you have selected.
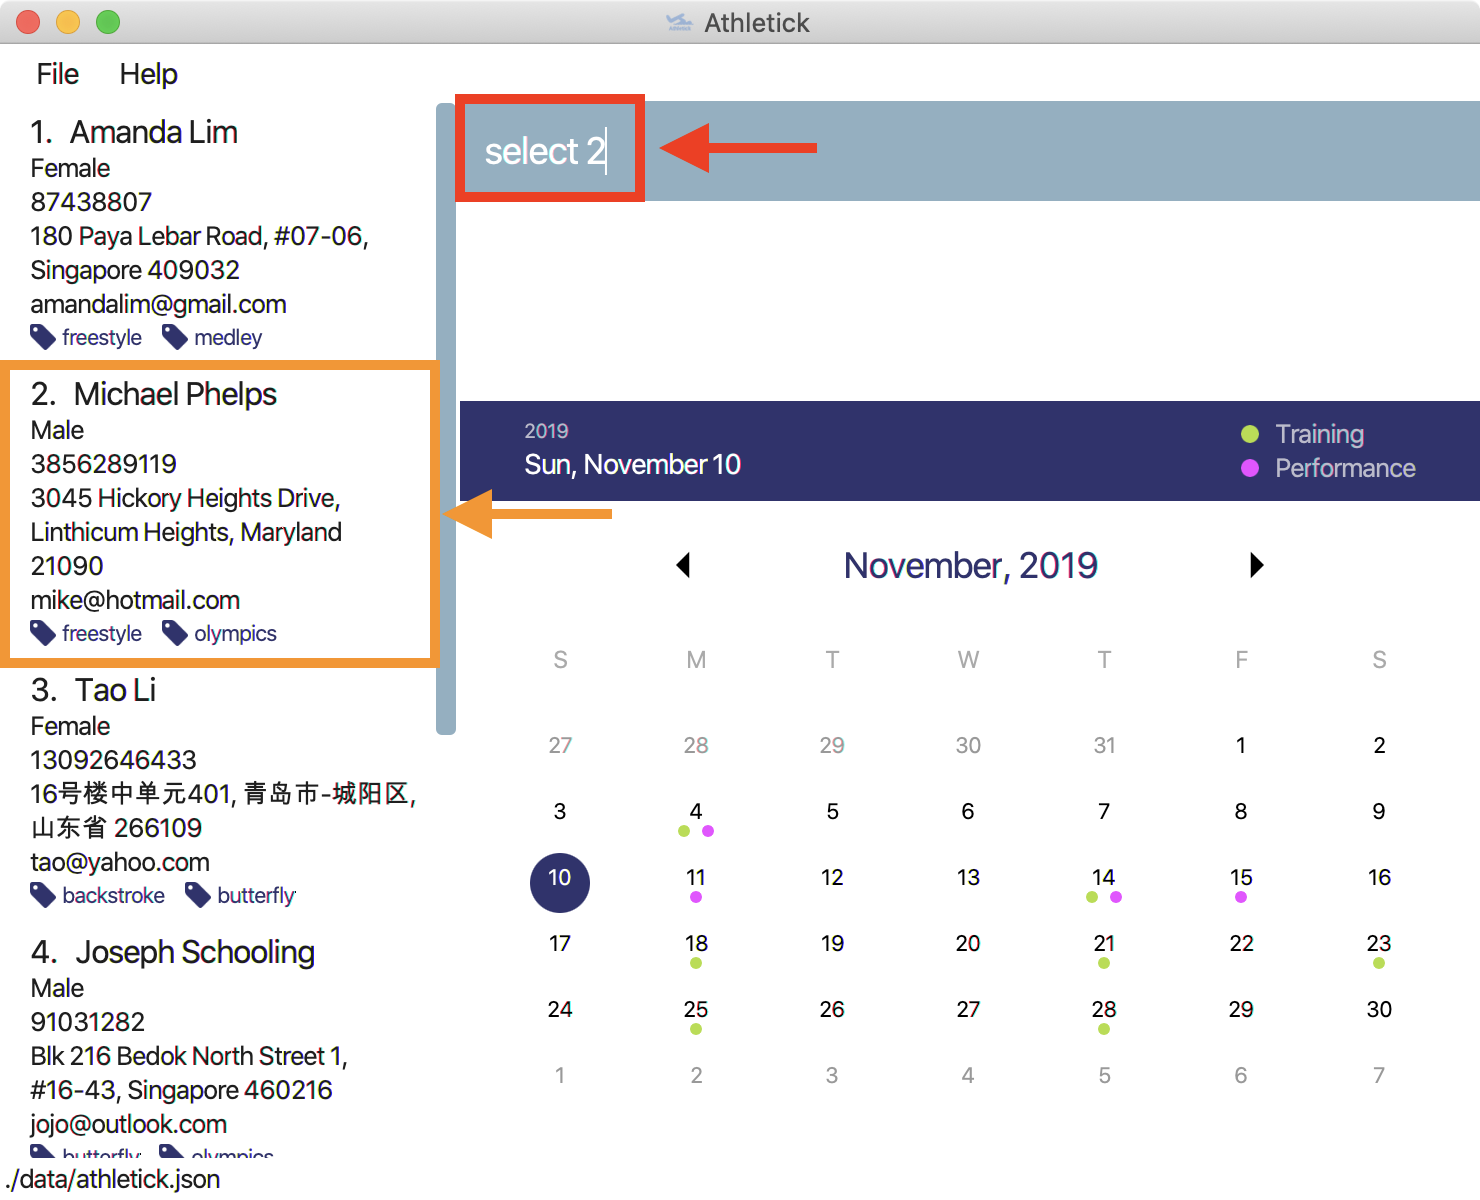
Let’s say you want to view Michael’s personal information.
What you should do
Type in the command in the following format.
Format : select INDEX
Example : select 2
What you should see
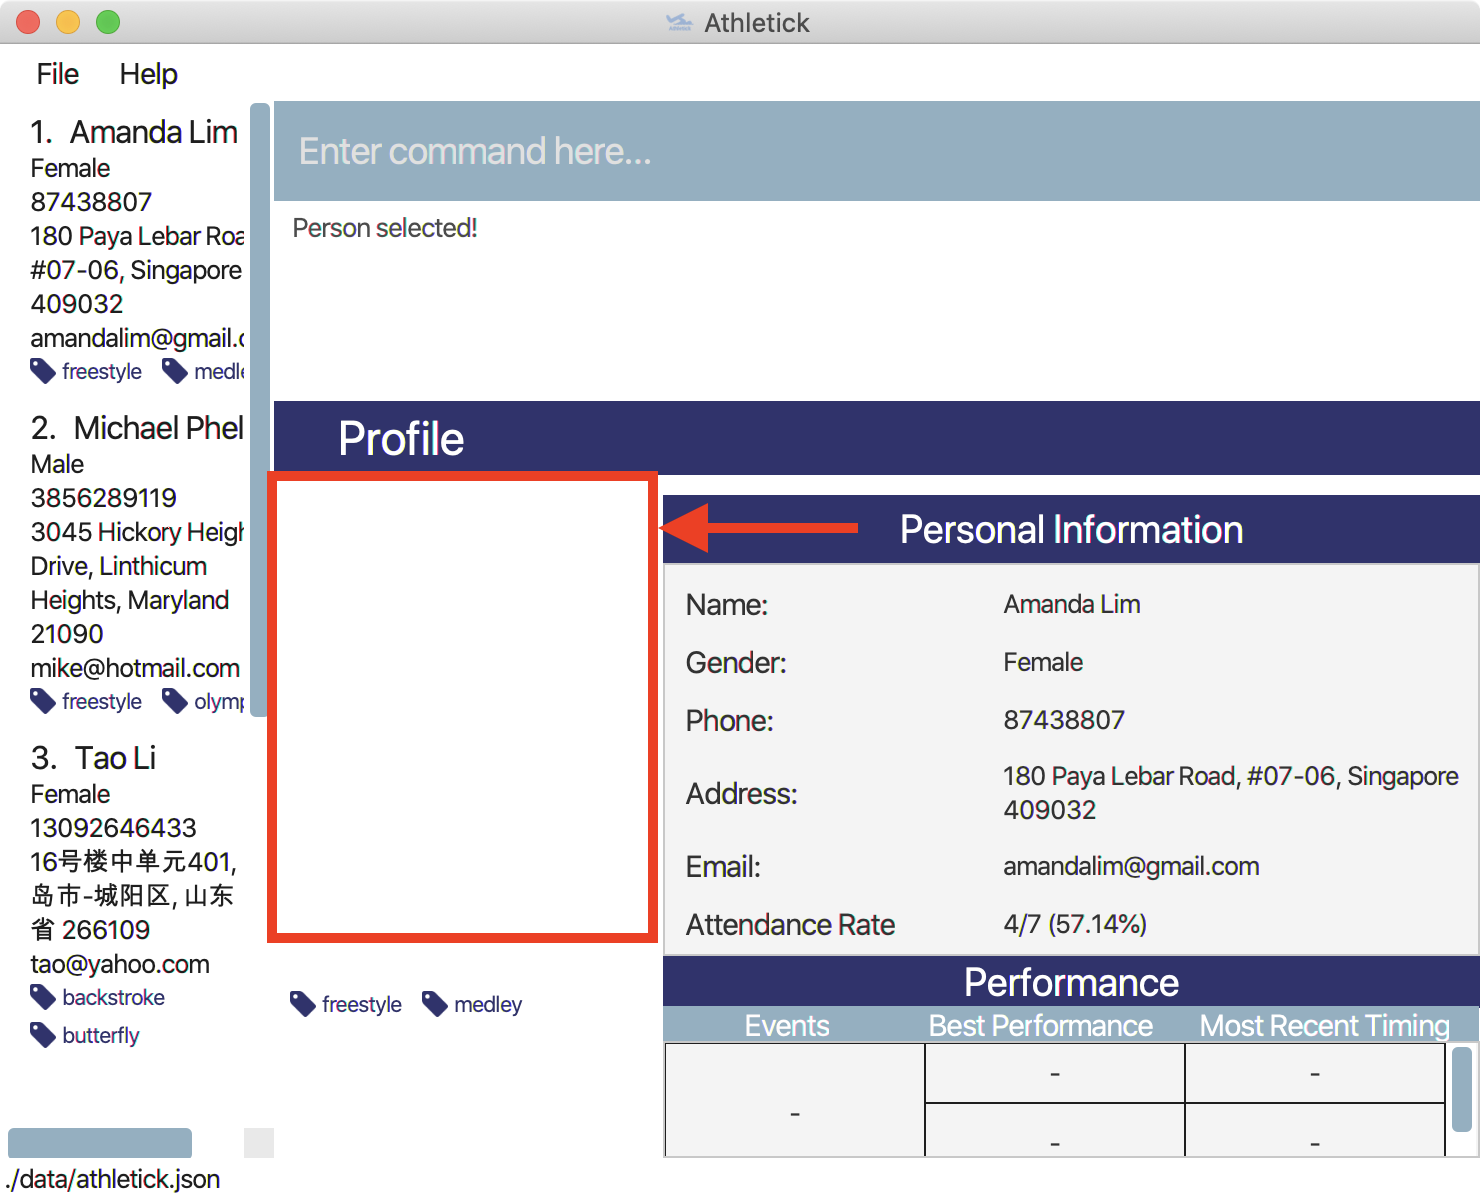
The message “Person selected!” will be displayed in the result box to indicate that you have selected the athlete.
In the feature box, the personal information of the athlete will be displayed as shown.

If the image of the selected athlete is not appearing as shown below, take note that the image file is not in the
images folder. You may refer to Section 3.2, “FAQ” section to know more on where to include the image files
which are going to be used and [Editing an athlete : edit] to understand further how to edit the image of
an athlete.
|
3.2. FAQ
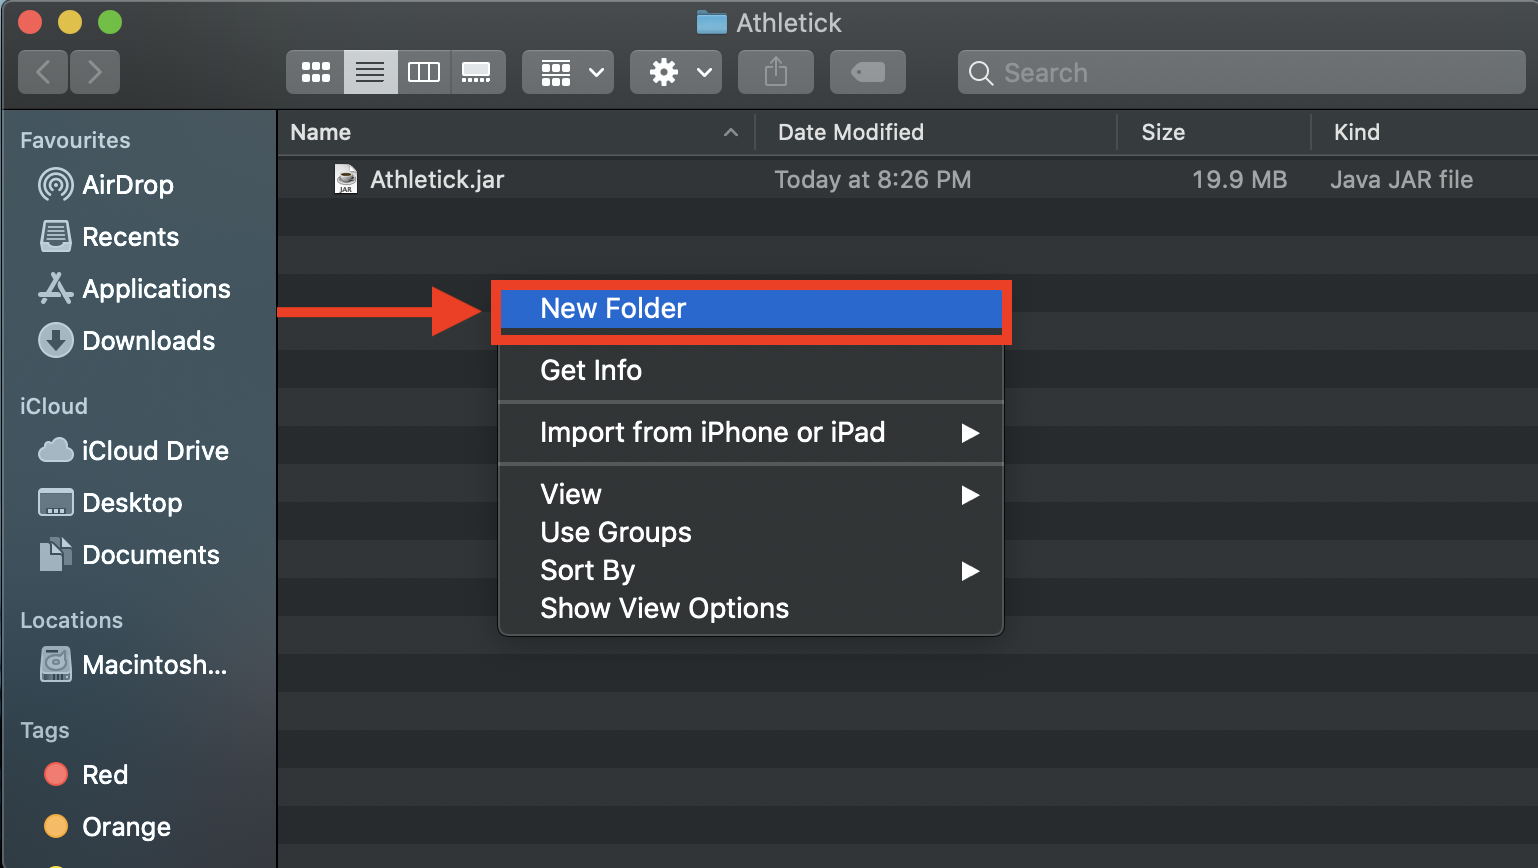
Q: How do I add my image files to the images folder?
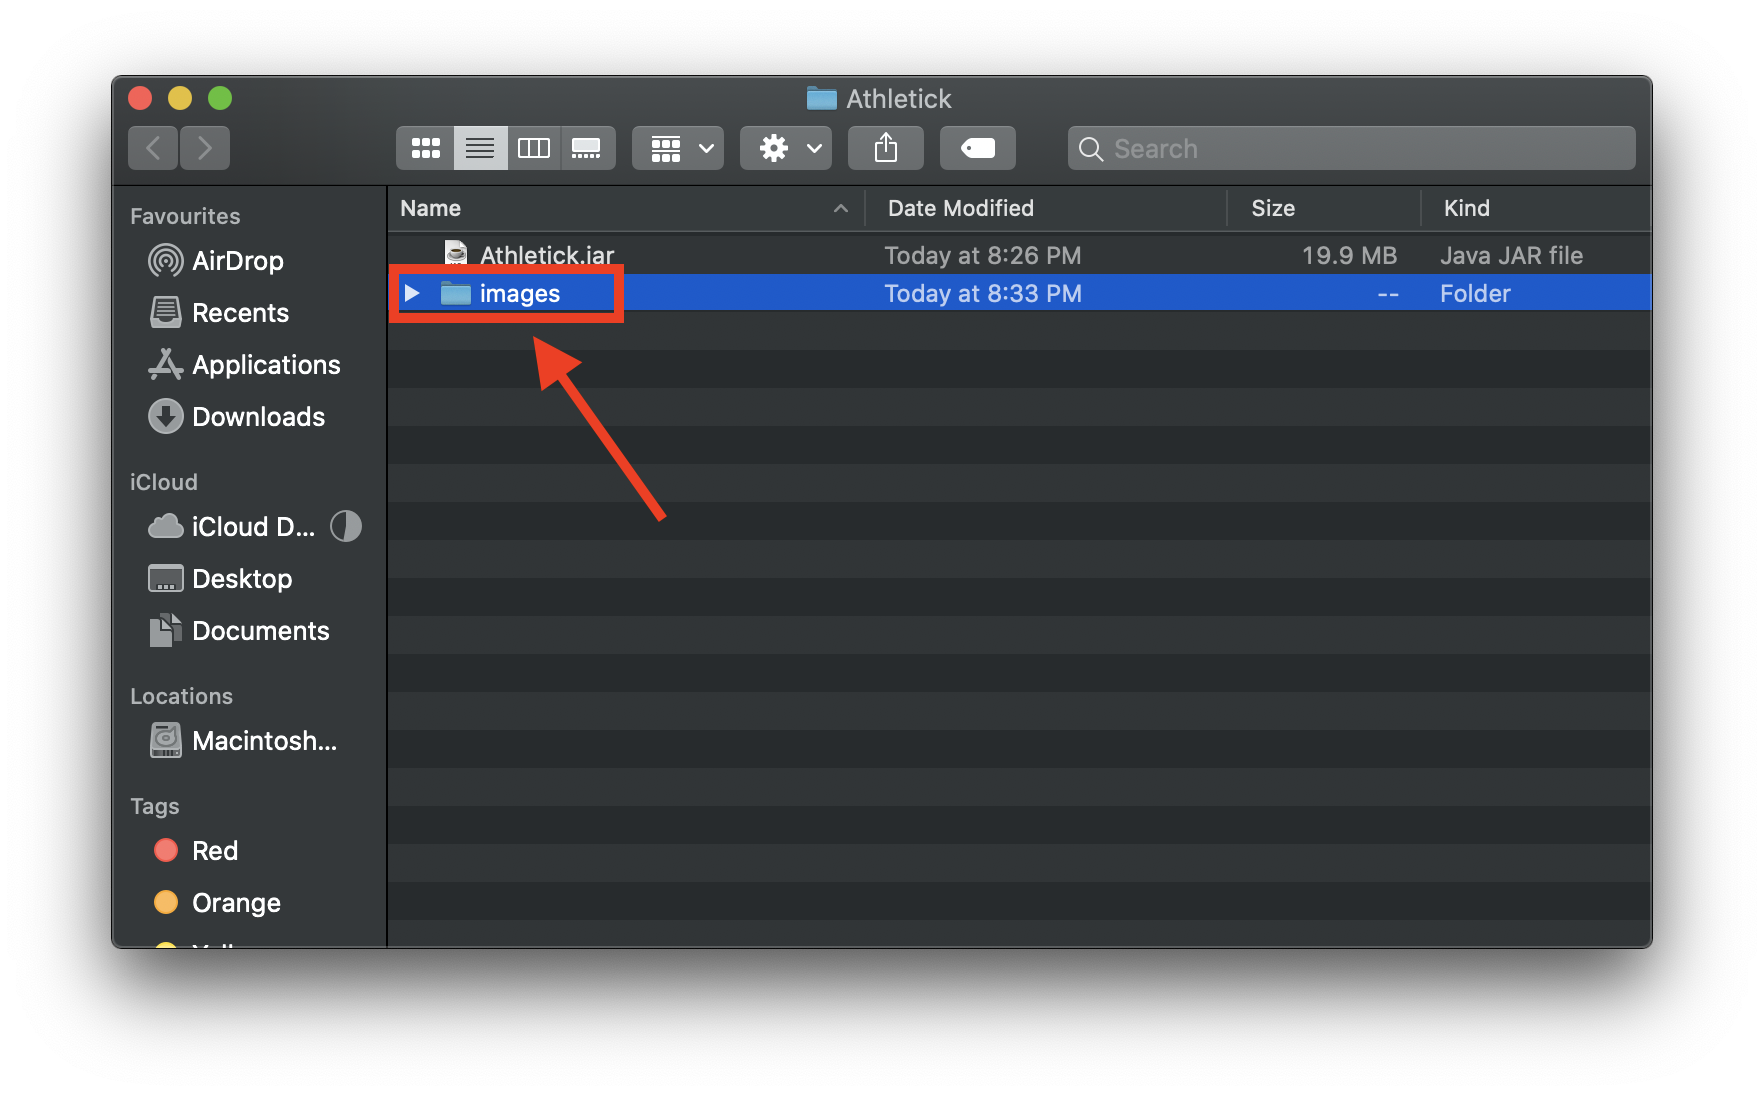
A: Make sure that the images folder is in the same directory as the Athletick executable jar file. If the
images folder is not created, the following steps will guide you through the creating of the images folder and
how to add images into the folder:
-
Create a folder named
imagesin the same directory as your executable jar file.
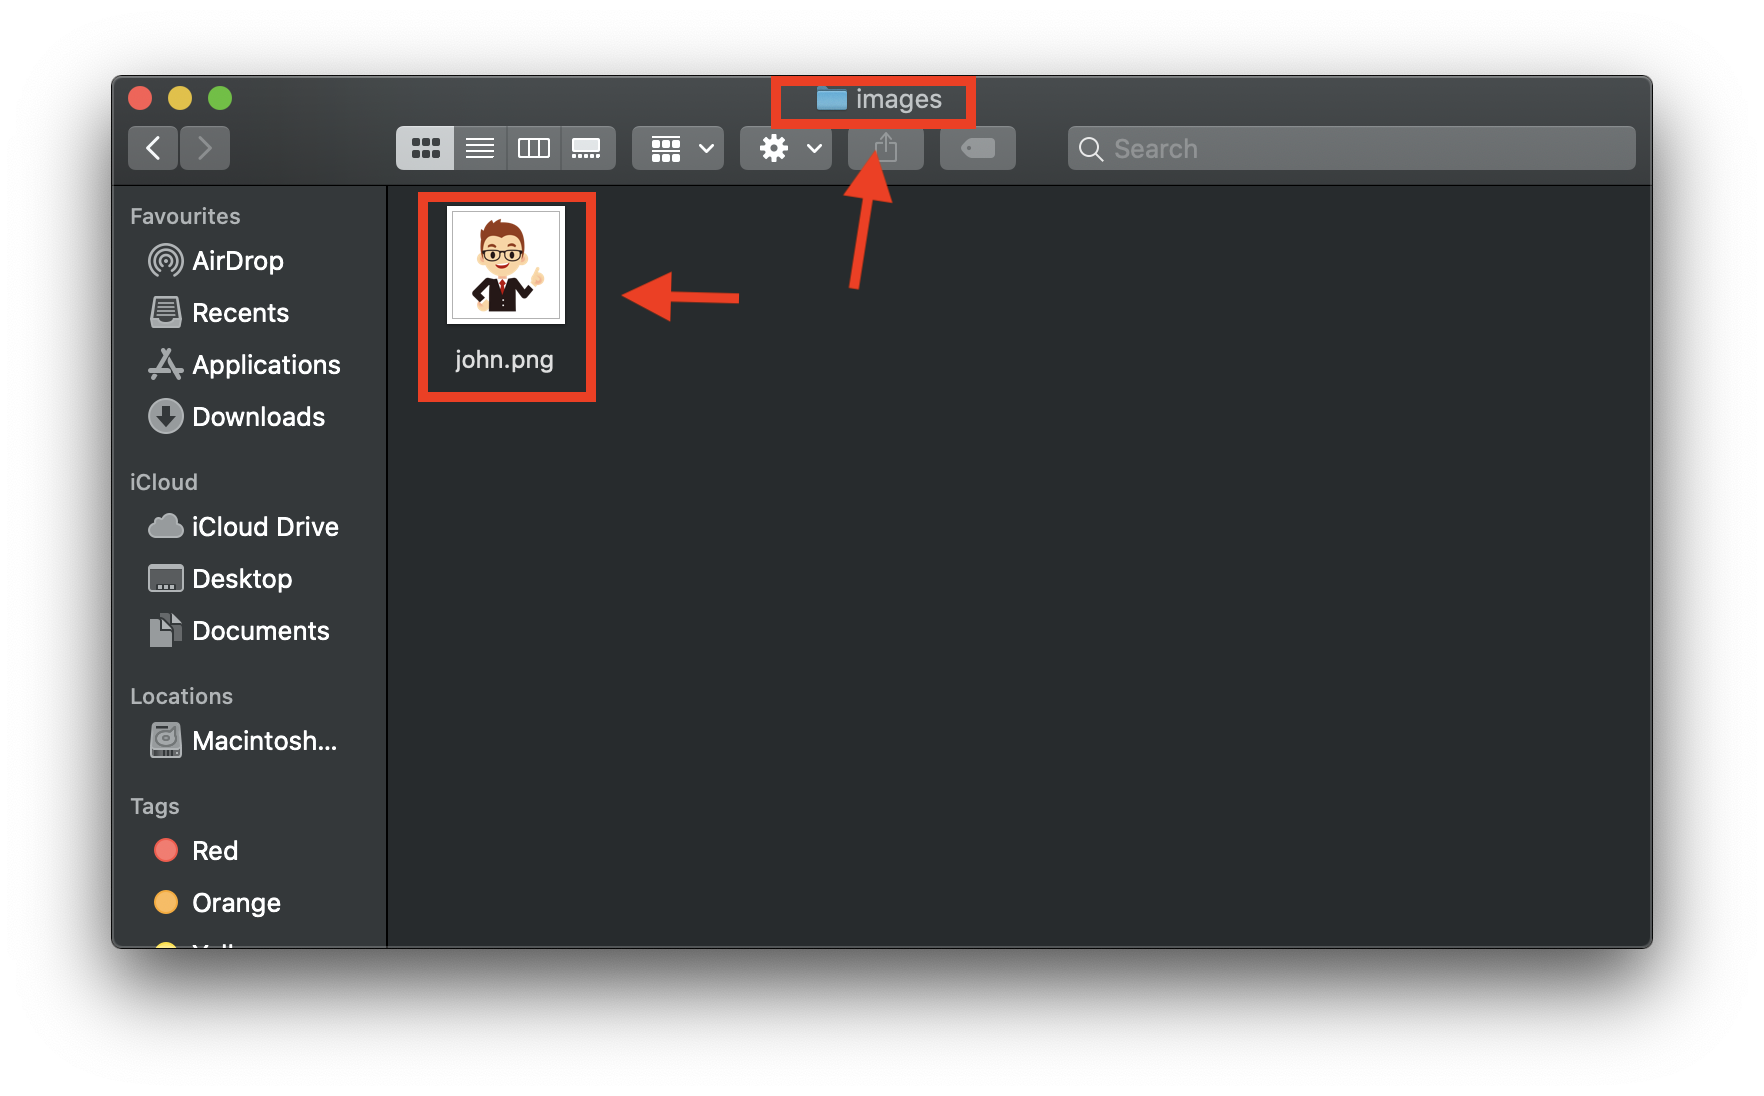
-
Ensure that the file name is correct.
-
Add the image files that you want to use into the folder.
{End of user guide extract}
4. Contributions to the developer guide
Given below are sections I contributed to the Developer Guide. They showcase my ability to write technical documentation and the technical depth of my contributions to the project.
{Start of developer guide extract}
4.1. Select feature
The select feature allows user to view the profile of a selected athlete.
4.1.1. Implementation
The implementation of the select feature consists of two parts, mainly the implementation of the command and the
implementation of the UI.
The implementation of the command is facilitated by SelectCommand class. It extends
Command and parses the arguments using SelectCommandParser. It implements one operation:
-
CommandResult#execute()— Executes the selectCommand which returns the athlete selected to be displayed in the UI.
The implementation of the UI portion for the select feature is facilitated by InformationDisplay. It
extends
UiPart<Region> and displays the personal information of the selected athlete. Additionally, it implements the
following operations:
-
InformationDisplay#displayPersonalInfo()— Displays the personal information of the selected athlete such as the name, email, address, phone number and other personal details. -
InformationDisplay#performanceDisplay()— Displays the performance of the selected athlete, which includes the event, best performance and most recent performance.
An example usage scenario is given below which elaborates how the select feature behaves at each step.
Step 1. The user executes the select 3 command. The command is then parsed by SelectCommandParser which
creates
an instance of SelectCommand. SelectCommand retrieves the athlete based on the index of the list
panel on the left.
When the command is executed, the athlete selected at the specified index will be stored in ModelManager as
selectedPerson using the operation Model#storePerson(Person).
Step 2. After the command has been executed, the selected athlete is retrieved in the MainWindow class. It checks whether an athlete has been selected and displays the selected athlete’s personal information.
The diagram below summarises the steps of the example scenario when a user executes the select command:

select command executionThe implementation was done this way because the Ui component interacts with both the Logic and Model component.
Firstly, the Ui component takes in the input from the user and allows SelectCommandParser in Logic component
to parse the argument.
After the argument has been parsed, the athlete is stored in the Model component which houses most of the data in the
app. The Ui listens for any changes made to the Model data, and updates the Ui to display the selected athlete.
The following sequence diagram shows how the select feature works:
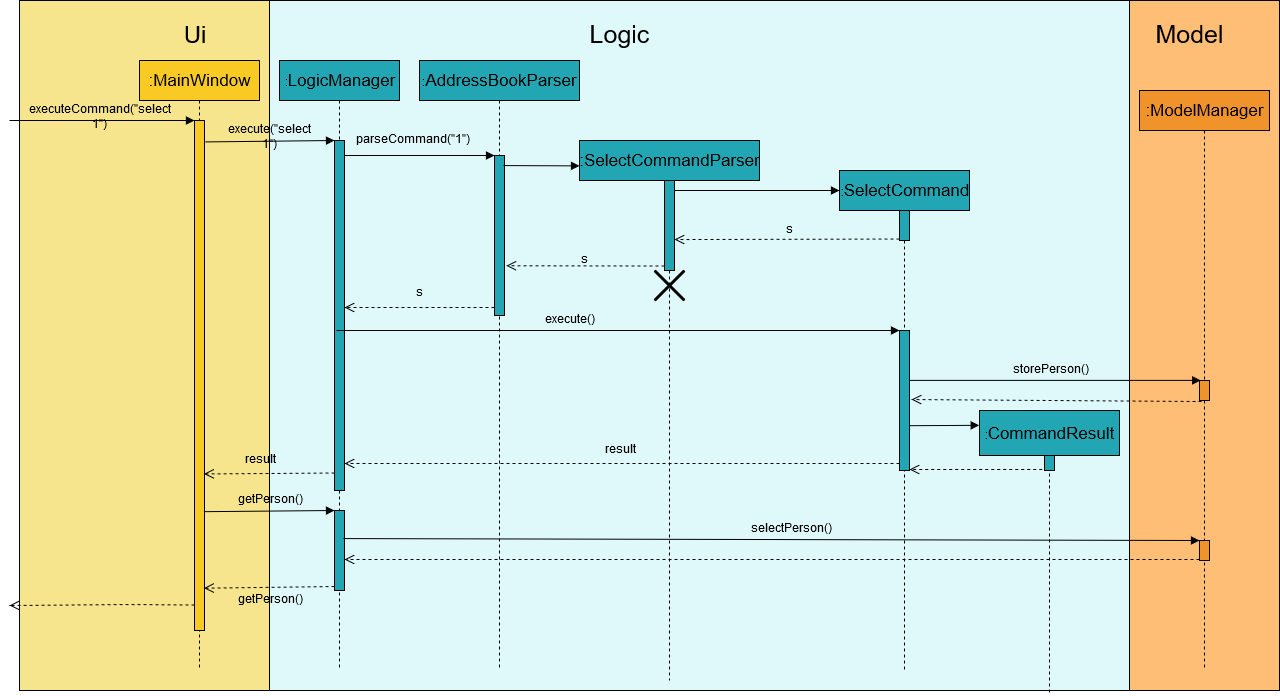
select Command4.1.2. Design considerations
There were some decisions that I had to make as I was designing the select feature and had to compare which methods
would better suit the application. The following consists of the design considerations for the select feature.
Aspect: How the personal information of the selected athlete will be displayed
There were a few ways how the personal information of the selected athlete could be displayed and the following alternatives are some of the considerations I had when implementing.
Alternative 1 (current choice): Displaying it in a feature box. |
Alternative 2: Displaying it in a tab form. |
Alternative 3: Displaying via a pop-up. |
|
Pros |
|
|
|
Cons |
|
|
|
Reason: Alternative 1 was chosen because it utilises more of the command line interface and we wanted to steer away from the use of the mouse. Even those the aesthetic might not be as good as alternative 2 and 3, I felt that it was a better choice as it was in line with the other features that my group mates were going to implement.
Aspect: How to select an athlete
There were two ways on how an athlete could be selected and it was between choosing by index or by name which I had to consider.
Alternative 1 (current choice): Choosing by the index number. |
Alternative 2: Choosing by name. |
|
Pros |
|
|
Cons |
|
|
Reason: In the end, I went with alternative 1 because it was more intuitive to use and was in line with some of the
other functions such as DeleteCommand or FindCommand which also uses index. It also reduces the
need to type out the full name of the selected athlete.
4.2. Adding/editing photo feature
The sub feature of AddCommand and EditCommand allows the inclusion of photo for an athlete.
4.2.1. Implementation
The sub feature is facilitated by Photo. It is similar to the other features such as Name and
Phone which uses a prefix i/ followed by the file name (e.g. i/default.png). Prior to adding the photo
of an athlete, the image file that is going to be used has to be in the images folder which will be generated when the
jar file is executed. Photo takes in the file name as a String and retrieves the photo to be added
or edited from the images folder.
The file name of the images is restricted to alphanumerics only and the file format that will be used is .png.
This is done to keep the file name simple.
|
4.2.2. Design Consideration
The following consists of some of the design consideration when I was designing this sub-feature.
Aspect: Regular expression for the file name
Alternative 1 (current choice): To use alphanumerics only. |
|
Pros |
Pros: Keeps it simple without the confusion of special characters. |
Reason: Alternative 1 was chosen because it simplifies the parsing of the filename and reduces the error it might have if special characters were included.
{End of developer guide extract}